> ## Documentation Index
> Fetch the complete documentation index at: https://doc.haipay.net/llms.txt
> Use this file to discover all available pages before exploring further.
# HaiPay Integration Process Guide
> Understand the full HaiPay merchant onboarding journey from application and technical preparation to testing and production launch.
If you need a quick answer, a standard HaiPay integration usually moves through five stages: account setup, review, technical configuration, API testing, and go-live notification.
HaiPay aims to provide secure and convenient overseas localized payment services and international credit card payment services, including services like collections(pay in), disbursements(pay out), and more.
To ensure smooth integration, this document provides the standardized HaiPay product integration process.
## 1. Overall Process
```mermaid theme={null}
flowchart LR
A[Account Registration] --> B[Account Verification]
B --> C[Account Review]
C --> D[Technical Parameter Configuration]
D --> E[API Request]
E --> F[Go-live Notification]
```
## 2. Specific Steps
### 2.1 **Account Registration**
Please provide your merchant name (letters or numbers) and email. We will register an account for you based on the information you provide and send the account details to you.
[//]: # "### 2.2 **Account Verification**"
[//]: # "Login to our platform using the account details you received. After logging in to the backend, please change your login password (for production environment). You need to fill in complete merchant information, including but not limited to company name, contact information, company registration details, etc."
[//]: #
[//]: # "Operation path: Merchant Information - Submit Certification. Note: Items marked with * are mandatory."
[//]: #
[//]: # " "
[//]: # "
"
[//]: # " "
[//]: #
[//]: # "In addition to filling out the information, you also need to prepare and upload the network entry documentation, which typically includes the following:"
[//]: #
[//]: # "
"
[//]: #
[//]: # "In addition to filling out the information, you also need to prepare and upload the network entry documentation, which typically includes the following:"
[//]: #
[//]: # " "
[//]: #
[//]: # "- A copy of the company registration document (scan or photo)."
[//]: # "- ID card/passport for company directors (scan or photo)."
[//]: # "- Company bank account details (for settlement)."
[//]: # "- Other supporting documents, such as business licenses, tax registration certificates, etc. (based on local requirements)."
### 2.2 **Account Review**
After submitting the network entry documents, our review team will verify the information you provided. The review typically takes 24 hours, depending on the situation. Once approved, we will notify you of the result in the dedicated integration group chat.
### 2.3 **Technical Configuration**
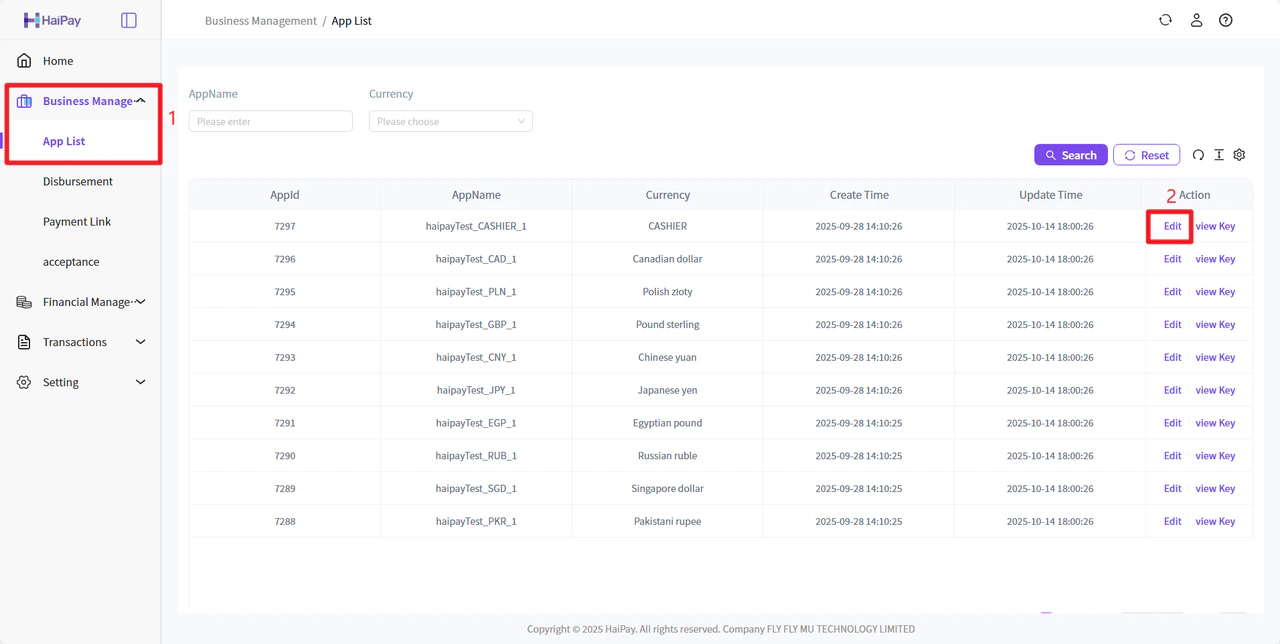
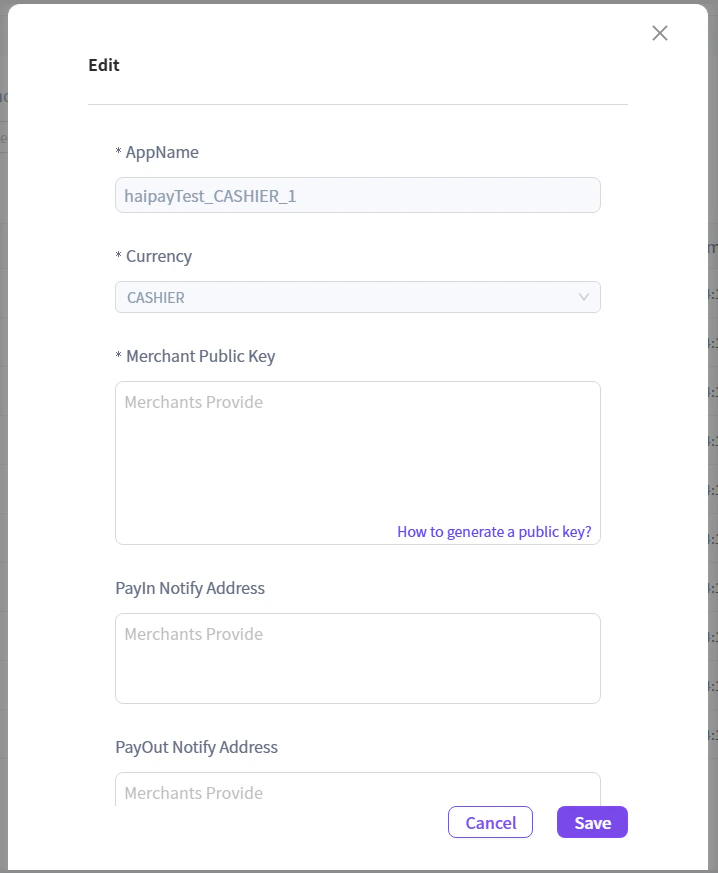
After approval, you can log into the backend to perform technical configuration. You need to configure:
* Merchant Public Key ([Your Public Key](/docs/en/guide/config_settings_and_signature_rules_guide)).
* IP whitelist (multiple IPs separated by commas ','), and also contact HaiPay's tech team in the integration group to add the IPs to the firewall whitelist.
* Collection callback URL and payment callback URL.
Configuration entry: "Business Management" - "Payment Product Configuration"
"
[//]: #
[//]: # "- A copy of the company registration document (scan or photo)."
[//]: # "- ID card/passport for company directors (scan or photo)."
[//]: # "- Company bank account details (for settlement)."
[//]: # "- Other supporting documents, such as business licenses, tax registration certificates, etc. (based on local requirements)."
### 2.2 **Account Review**
After submitting the network entry documents, our review team will verify the information you provided. The review typically takes 24 hours, depending on the situation. Once approved, we will notify you of the result in the dedicated integration group chat.
### 2.3 **Technical Configuration**
After approval, you can log into the backend to perform technical configuration. You need to configure:
* Merchant Public Key ([Your Public Key](/docs/en/guide/config_settings_and_signature_rules_guide)).
* IP whitelist (multiple IPs separated by commas ','), and also contact HaiPay's tech team in the integration group to add the IPs to the firewall whitelist.
* Collection callback URL and payment callback URL.
Configuration entry: "Business Management" - "Payment Product Configuration"
 ### 2.4 **API Requests**
After completing the technical configuration, you can begin using the APIs we provide to perform business operations. Please ensure you follow the instructions in the API documentation to send API transaction requests.
If you encounter any issues during the onboarding process or need further assistance, please feel free to contact our 24-hour on-duty operations team in the dedicated integration group chat.
### 2.5 **Go-Live Notification**
After acceptance, please notify our on-duty operations team before going live (sync in the dedicated integration group chat).
Test and production environments do not share information. Please notify us before going live, and we will provide your production environment merchant account details.
Before going live, please review our [Production Checklist](/docs/en/guide/onboarding_checklist) to ensure all configurations are correct.
## Related Topics
* [HaiPay Integration Steps Guide](/docs/en/guide/integration_guide)
* [HaiPay End-to-End Testing Guide](/docs/en/guide/end_to_end_testing)
* [HaiPay Onboarding Checklist](/docs/en/guide/onboarding_checklist)
### 2.4 **API Requests**
After completing the technical configuration, you can begin using the APIs we provide to perform business operations. Please ensure you follow the instructions in the API documentation to send API transaction requests.
If you encounter any issues during the onboarding process or need further assistance, please feel free to contact our 24-hour on-duty operations team in the dedicated integration group chat.
### 2.5 **Go-Live Notification**
After acceptance, please notify our on-duty operations team before going live (sync in the dedicated integration group chat).
Test and production environments do not share information. Please notify us before going live, and we will provide your production environment merchant account details.
Before going live, please review our [Production Checklist](/docs/en/guide/onboarding_checklist) to ensure all configurations are correct.
## Related Topics
* [HaiPay Integration Steps Guide](/docs/en/guide/integration_guide)
* [HaiPay End-to-End Testing Guide](/docs/en/guide/end_to_end_testing)
* [HaiPay Onboarding Checklist](/docs/en/guide/onboarding_checklist)