

1. Overview
HaiPay has launched a brand-new Key Configuration Panel, designed to provide merchants with a more convenient and more secure key management experience. The new panel is compatible with the original configuration logic and adds the following core features:- One-click key pair generation — Merchants can generate RSA 2048 public/private key pairs directly on the platform side, without installing additional tools
- Flexible business ID mapping — Supports configuring different public keys for different business IDs (appIds), as well as one-click configuration for “All” business IDs
- Batch key replacement — Intuitively manage the mapping between business IDs and keys through a transfer box
- Multi-dimensional key viewing — Merchant public keys, HaiPay public keys, and encrypted fields are managed in separate tabs
Signatures use the SHA256WithRSA algorithm with a key length of 2048 bits. The merchant private key is used to sign request messages, and the merchant public key is uploaded to HaiPay for signature verification; the HaiPay public key is used to verify the signatures of messages returned by the platform.
Role of Public and Private Keys
In HaiPay’s communication architecture, public and private keys provide the core security guarantee for request signing and response verification:Figure 1: Public/private key signing and verification flow between the merchant and the platform
2. Prerequisites
Before using the key configuration panel, make sure you have completed the following preparations:1
Obtain a merchant platform account
After the partnership is confirmed, HaiPay will create a Merchant Management Platform account based on the “Administrator Account Information” filled in the Merchant Access Application Form. Please watch for the activation email from HaiPay and activate the account as instructed. The first login requires a password change.
2
Log in to the Merchant Management Platform
Log in to the HaiPay Merchant Management Self-Service Platform with the activated administrator account.
3
Enter Development Configuration
In the merchant main menu, find the new “Development Configuration” menu and click it to open the key configuration panel.
3. Panel Overview
After entering “Development Configuration” - “Key Configuration”, you will see the following panel. At the top of the panel there are three tabs, each managing a different type of key: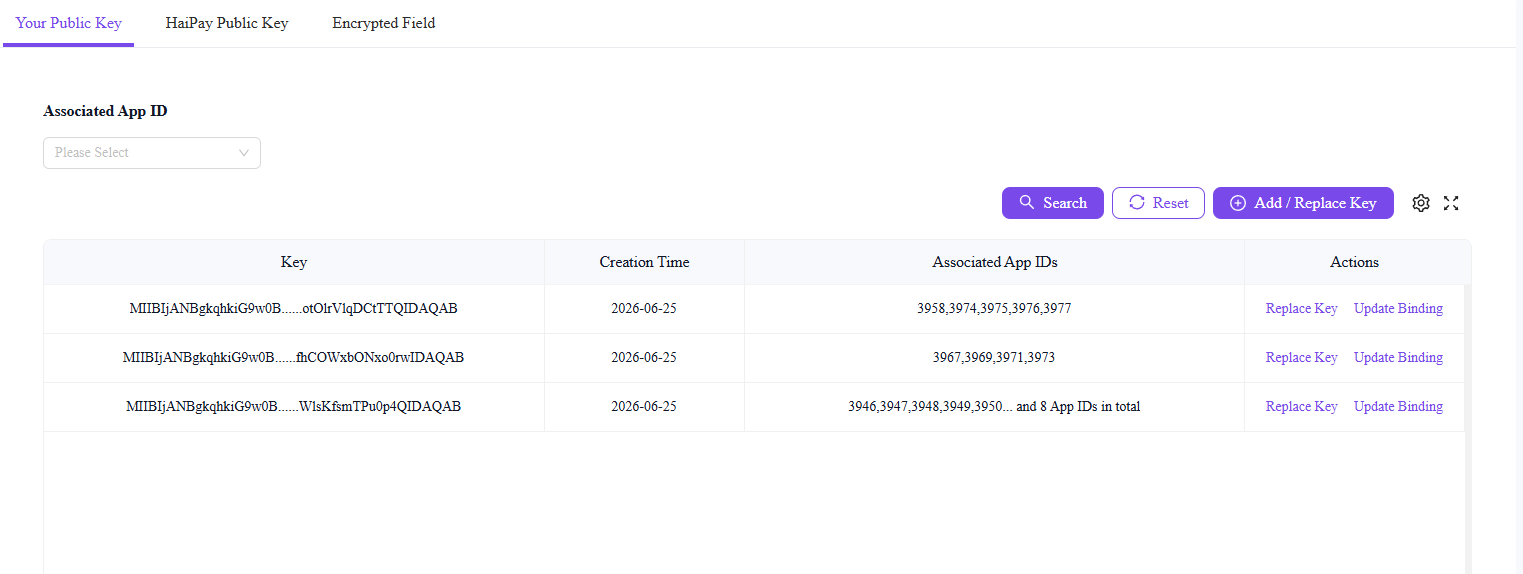
Figure 2: Key configuration panel main page — Your Public Keys tab
For new merchants, the platform public key and encrypted fields are configured to the “All” business ID by default. For existing merchants with multiple different public keys, they will be displayed as multiple rows.
Key Display and Copy
The key content in the panel is long, so it is displayed with ellipsis in the middle for readability. Click a key field to copy the full content to the clipboard.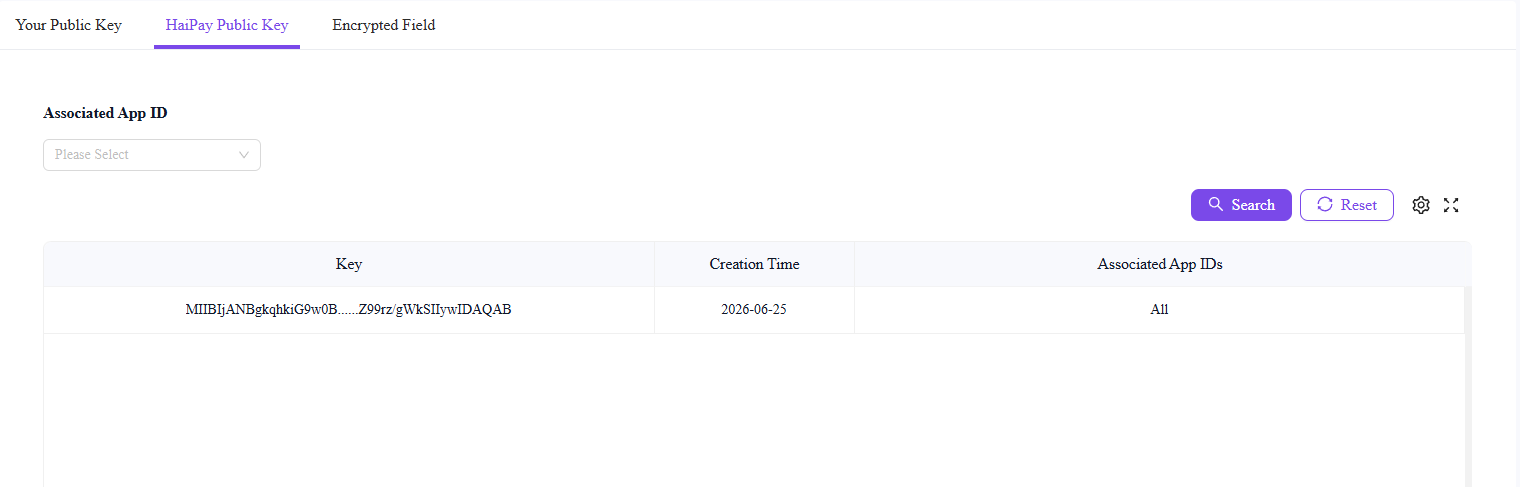
Figure 3: HaiPay Public Keys tab — switch to view and search platform public keys
4. Business ID Filter
At the top of the panel, the Business ID filter supports single-select dropdown search. You can search all appIds associated with the merchant to filter the view.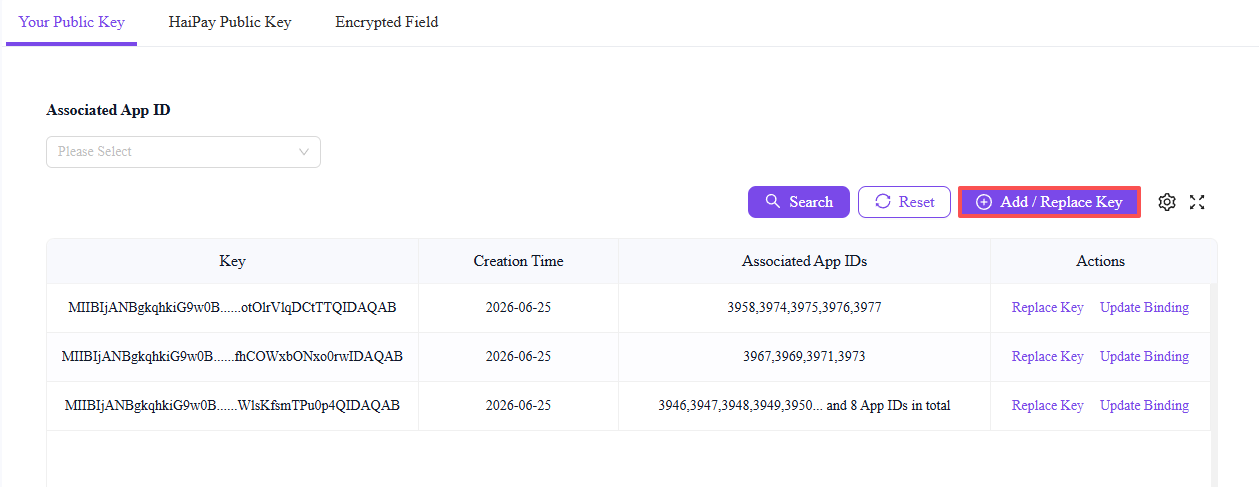
Figure 4: Business ID filter — supports searching for a specific appId in the dropdown
About the “All” business ID
- If all of a user’s appIds use the same key, the appId column displays “All”
- No matter which appId the user searches for, the row with the “All” option is always displayed
- When the appId is “All”, businesses added later are automatically configured with this public key
5. Add/Replace Keys
Click the “Add/Replace Key” button in the upper-right corner of the panel to open the key configuration dialog. In this dialog, you can select the key generation method and the business ID mapping scope.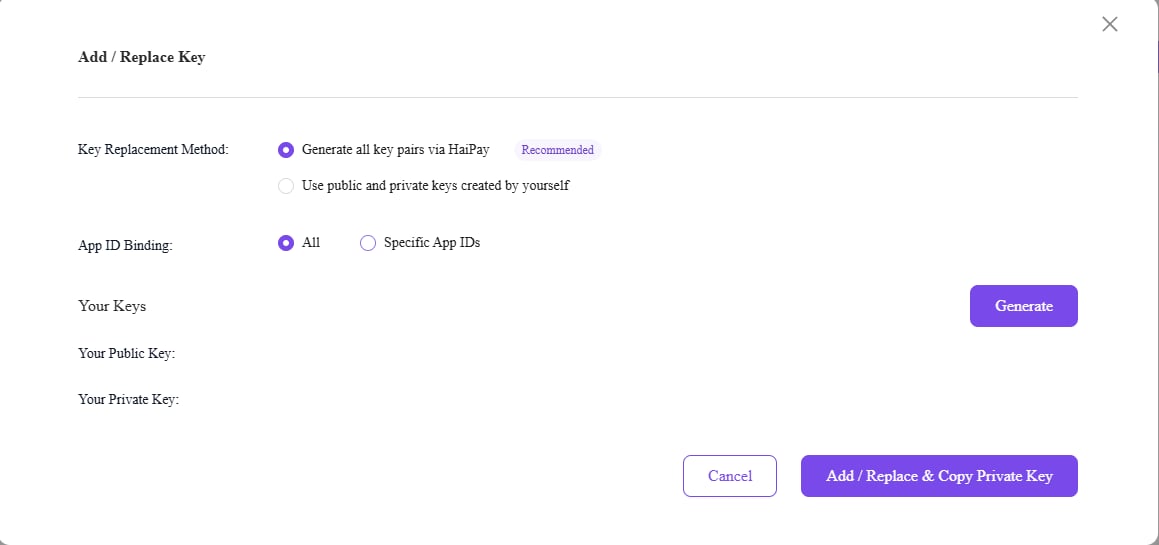
Figure 5: Add/Replace Key dialog — select the generation method and mapping scope
1
Select the key replacement method
Two methods are available (see the next chapter for details):
- Recommended Generate all public/private keys with HaiPay — the platform generates an RSA 2048 key pair, the private key is copied to the clipboard, and only the public key is stored on the platform
- Use your own public/private keys — manually enter a pre-generated public key
2
Select the business ID mapping scope
Two options are available:
- All — the key applies to all business IDs
- Specific Business IDs — opens a transfer box to configure the public key for specific business IDs
3
Generate or enter the key
Depending on the selected method, click the “Generate” button to generate a key pair, or enter your public key in the text box.
4
Confirm the replacement
Click the button at the bottom to submit, and the system will show a secondary confirmation dialog. Once confirmed, the new key takes effect immediately and the old key becomes invalid.
6. Key Generation Methods
Method 1: One-Click Generation by HaiPay Recommended
This is the simplest method. After you click “Generate”, the HaiPay platform will directly generate an RSA 2048 public/private key pair for you.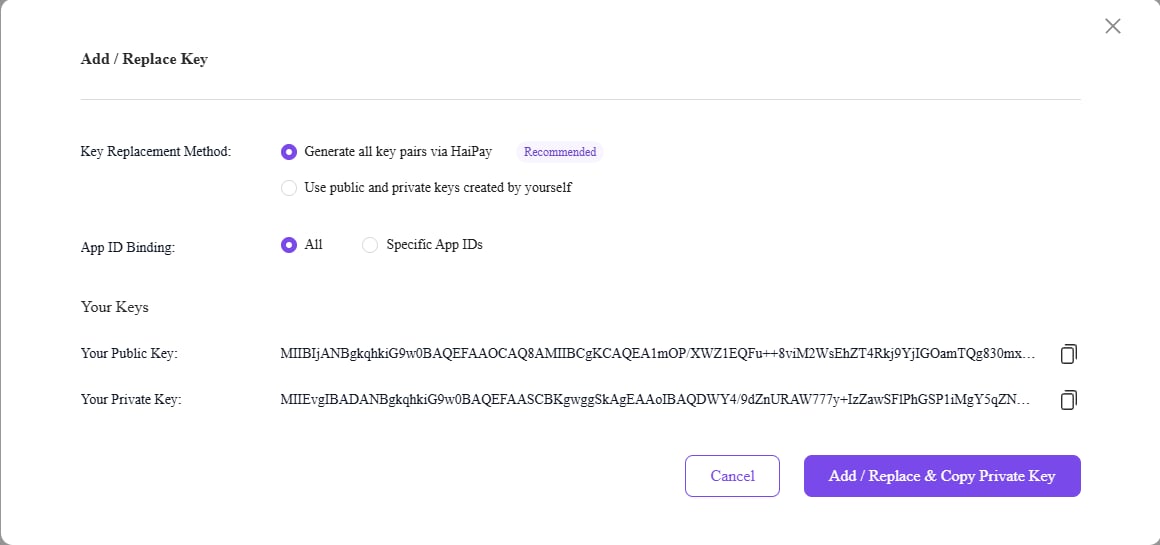
Figure 6: Key configuration interface after selecting “Generate with HaiPay”
1
Select the generation method
In the dialog, select “Generate all public/private keys with HaiPay” (selected by default and marked as “Recommended”).
2
Click the "Generate" button
The system generates an RSA 2048 public/private key pair on the platform side. The public key is displayed in the “Your Public Key” field, and the private key in the “Your Private Key” field.
3
Click "Add/Replace and Copy Private Key"
After submitting the replacement, the private key is automatically copied to your clipboard. Save it to a secure location immediately.
4
Secondary confirmation
The system shows a secondary confirmation dialog; once confirmed, the new key takes effect immediately.
- The private key is not stored on the platform — it is only copied to the clipboard this once. Make sure to save it immediately; it cannot be retrieved again after closing the page.
- After replacing a key, the original key becomes invalid immediately, and requests signed with the old key will fail signature verification.
- Perform this operation during off-peak business hours, and make sure the new key has been configured in your system before replacing.
Method 2: Use Your Own Public/Private Keys
If you already have a key pair or prefer to manage the key generation process yourself, you can choose this method. A text box will appear, asking you to enter the public key.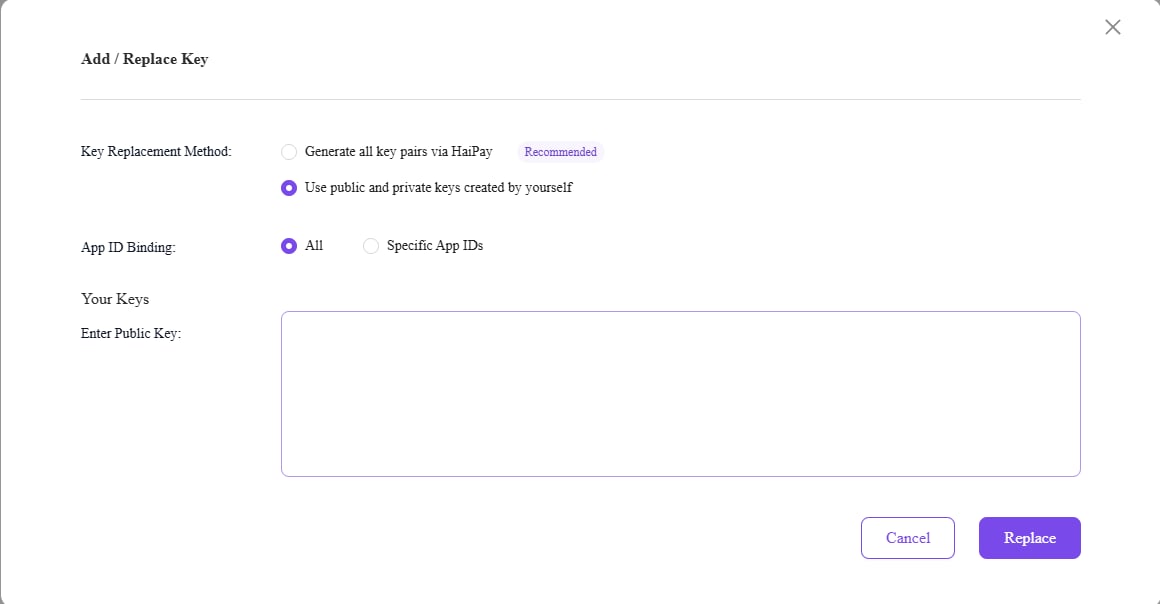
Figure 7: Select “Use your own public/private keys” — the public key must be entered manually
OpenSSL
Use the openssl command-line tool to generate an RSA 2048-bit key pair. OpenSSL must be installed; the key length is 2048 bits. Refer to online examples.
Online generation tool
Use the online RSA key generation tool provided by HaiPay (implemented purely in JavaScript, with no server interaction, so merchant key information is never leaked).
Code generation
Use Java, PHP, or other SDK code to generate an RSA 2048-bit key pair and convert it to PEM format.
Differences from Method 1When you choose the self-created method, the replacement still requires a secondary confirmation dialog, but the private key is not copied to the clipboard (because the platform does not generate a private key in this case). The private key is kept by you.
7. Business ID Mapping
In the Add/Replace Key dialog, “Mapped Business IDs” provides two options: “All” and “Specific Business IDs”. Your choice determines how the key is associated with business IDs.7.1 Keep the Default Mapping (Select “All”)
When “All” is selected, the new public key applies to all business IDs under the merchant. Businesses added later are automatically configured with this public key as well.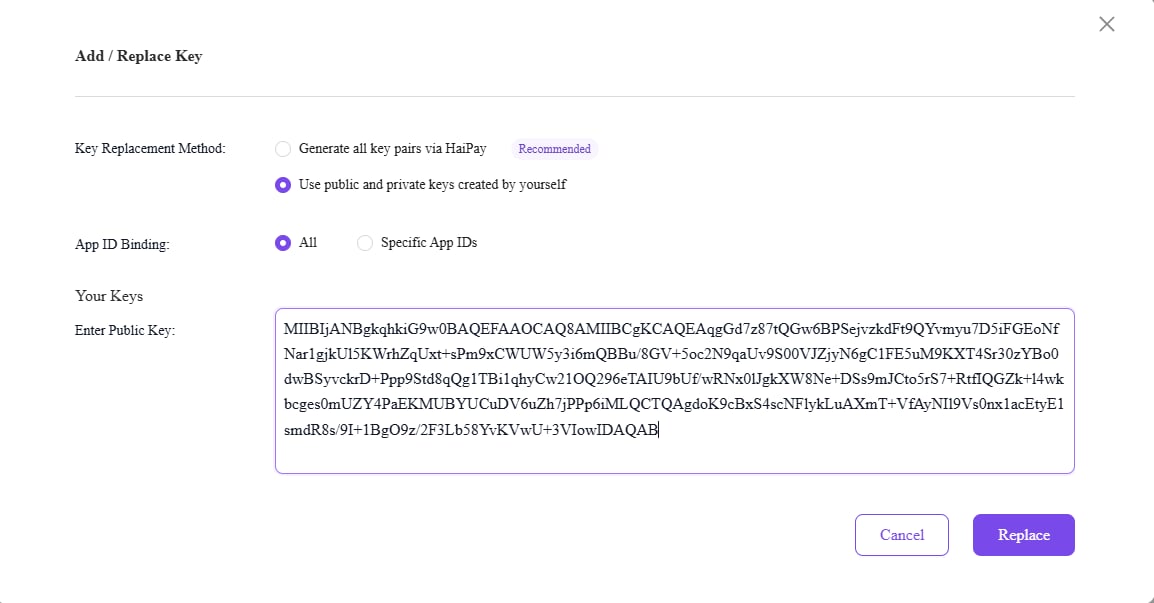
Figure 8: Mapped business IDs set to “All” — the public key applies to all business IDs
7.2 Change Key Mapping (Select “Specific Business IDs”)
When “Specific Business IDs” is selected, a transfer box opens, where you can select which business IDs to map the public key to.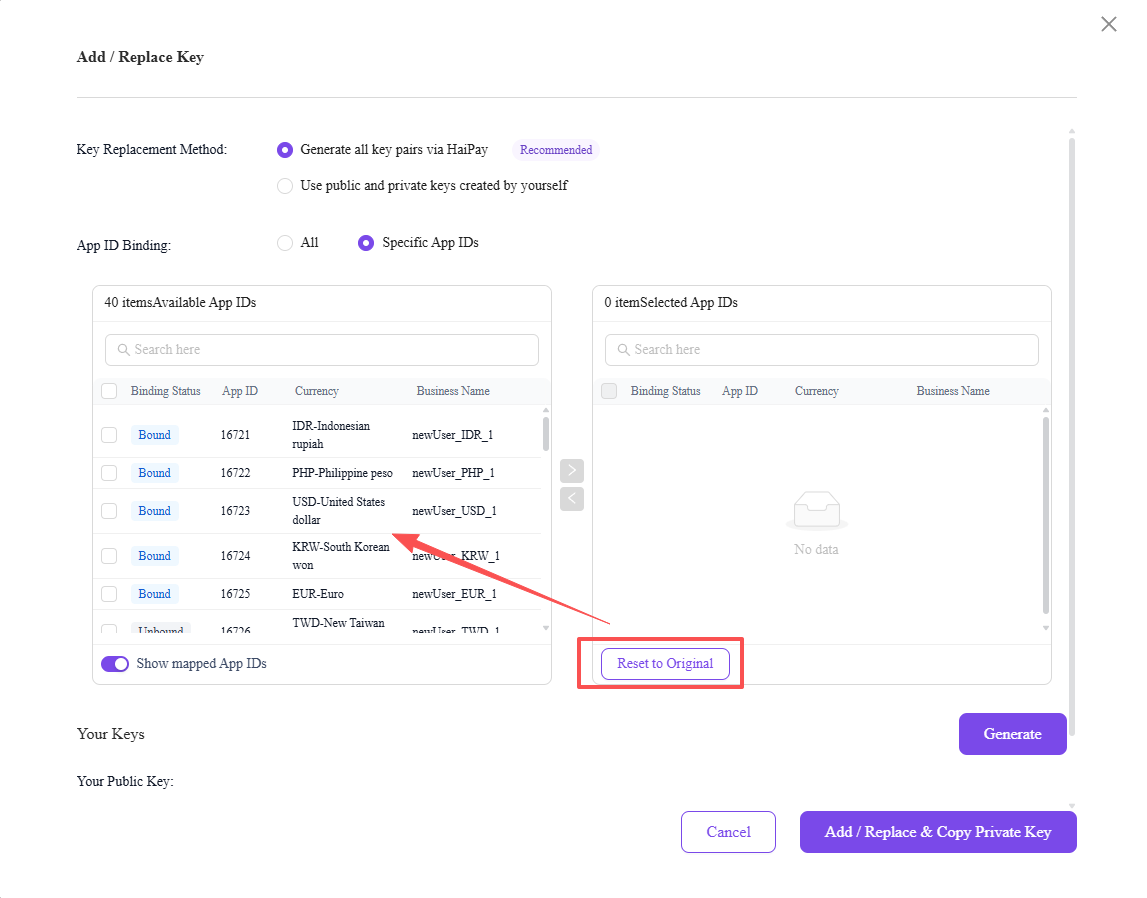
Figure 9: Transfer box interface — the left side shows unmapped/all business IDs, and the right side shows selected business IDs
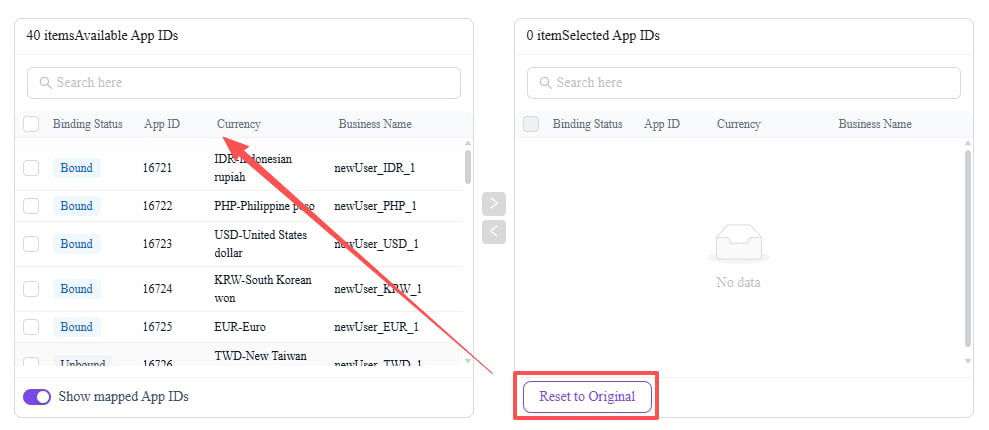
Figure 10: Transfer box detailed view — with search, pagination, and transfer buttons
8. Key Overwrite Reminders
When you submit a configuration in the Add/Replace Key dialog, if the new mapping scope would overwrite the association of existing public keys, the system will automatically pop up a key overwrite reminder, informing you which business IDs will be affected. This is designed to prevent signature verification failures caused by accidental operations.When is the overwrite reminder triggered?The overwrite reminder is triggered when the business IDs mapped to your new key are already associated with other public keys. The system asks you to confirm whether to replace the original public key associations of these business IDs with the new one.
Figure 11: Complete key overwrite reminder flow — from submission to secondary confirmation to taking effect
8.1 Partial Mapping Overwrite
When your changes affect only some of the mapped business IDs, the system pops up a “Key Overwrite Reminder” dialog that clearly lists the specific affected business IDs. The dialog contains the following:- Title: Key Overwrite Reminder
- Warning message: “This change will overwrite the keys associated with the following business IDs, and the old keys will become invalid immediately. Continue?”
- Affected business IDs: The system lists all affected appIds line by line (e.g., 1122, 3344, 5566)
- Action buttons: “Cancel” (returns to the dialog) / “Confirm Replacement” (proceeds to secondary confirmation)
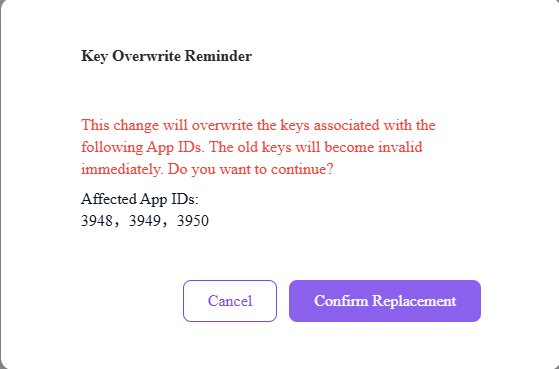
Figure 12: Key overwrite reminder (partial mapping overwrite) — lists the specific affected business IDs
8.2 Full Mapping Overwrite
When you change a public key that originally maps only some business IDs to “All” business IDs, this operation overwrites the key associations of all business IDs. The pop-up warns that all business IDs will be affected. The dialog contains the following:- Title: Key Overwrite Reminder
- Warning message: “This change will overwrite the keys associated with all business IDs, and the old keys will become invalid immediately. Continue?”
- Action buttons: “Cancel” (returns to the dialog) / “Confirm Replacement” (proceeds to secondary confirmation)
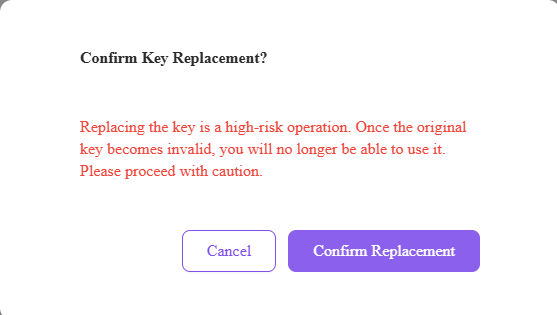
Figure 13: Key overwrite reminder (full mapping overwrite) — warns that all business IDs will be affected
“Full mapping overwrite” means all business IDs under the merchant will have their keys replaced at once. This is the operation with the widest impact. Please confirm:
- The new private key has been saved securely and configured in all your business systems
- The operation is performed during off-peak business hours
- The relevant development/operations teams have been notified and are ready
8.3 Secondary Confirmation
Whether you click “Confirm Replacement” in the partial or full mapping overwrite reminder dialog, the system will show a secondary confirmation dialog as the last line of defense. The secondary confirmation dialog contains the following:- Title: Confirm Key Replacement?
- Warning message: “Replacing a key is a high-risk operation. Once the original key is invalidated, it can no longer be used. Proceed with caution.”
- Action buttons: “Cancel” (returns to the overwrite reminder dialog) / “Confirm Replacement” (executes the replacement; the key takes effect immediately)
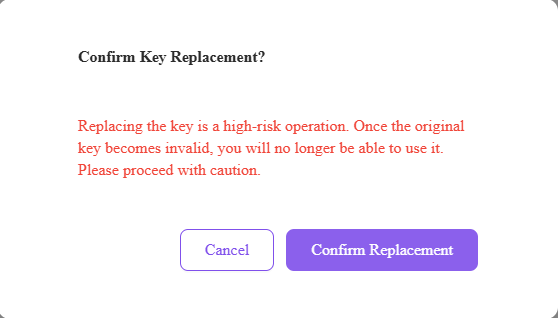
Figure 14: Secondary confirmation dialog — reminds that replacing a key is a high-risk operation
8.4 Execution Logic After Confirmation
After you click “Confirm Replacement” in the secondary confirmation dialog, the system executes the key replacement immediately. The logic is as follows:About the “Back/Cancel” buttonsIn both the first-layer overwrite reminder dialog and the second-layer secondary confirmation dialog, clicking “Cancel” or “Back” returns to the key configuration dialog instead of closing it directly. You can continue editing the configuration or close the dialog manually.
9. Replace Key or Change Mapping Individually
In addition to using the “Add/Replace Key” button at the top for batch operations, you can also perform individual operations on a specific public key. In the “Actions” column of the data table, each row provides two action links: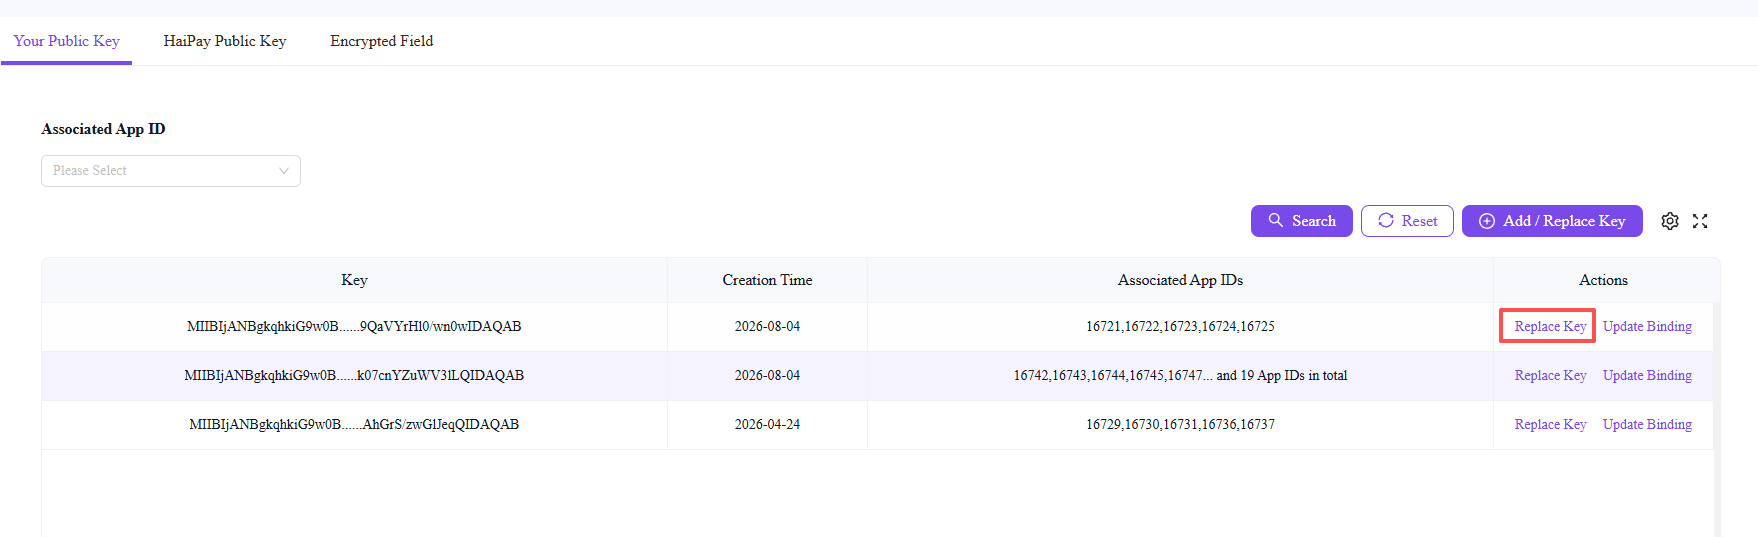
Figure 15: Actions column — “Replace Key” and “Change Business ID Mapping”
Individual operations work the same way as the top button, with the following differences:
- When replacing a key, the business ID mapping is fixed; only the key content is changed
- When changing the mapping, the public key is fixed and optional to modify; only the mapping scope is adjusted
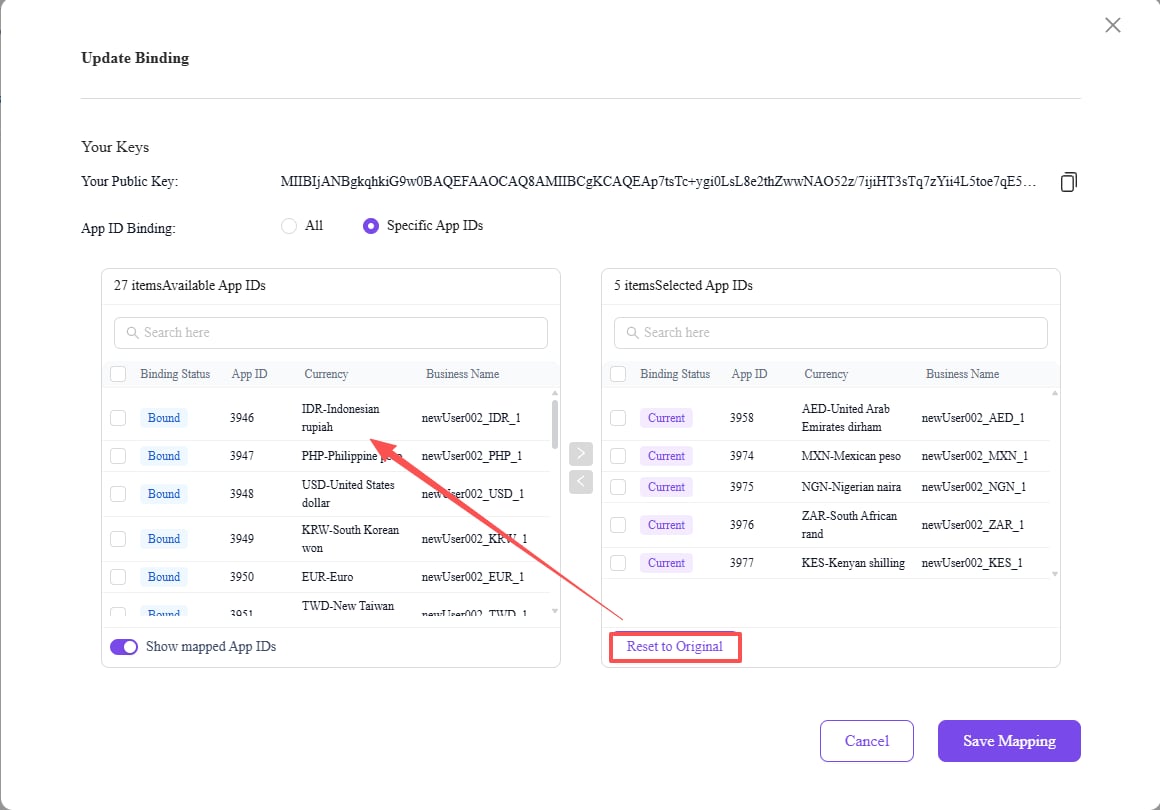
Figure 16: Change Business ID Mapping — select the new mapping scope in the transfer box
10. Security Best Practices
- The private key is displayed only once — when the platform generates a key pair with one click, the private key is only copied to the clipboard and is not stored on the platform. It cannot be retrieved again after closing the page.
- merchantSecretKey and the merchant RSA private key are both sensitive information. Do not place them in frontend code, client applications, logs, or public repositories.
- Save the private key immediately — after generating a key, immediately save the private key to a secure key management system or encrypted storage.
- Key leakage response — if a key is accidentally leaked, update the key through the platform as soon as possible.
Signature Security Rules
Signature generation rule:
Include every parameter whose value is neither
null nor "", exclude the sign and sign_type fields, sort the remaining field names in ASCII ascending order, and concatenate each key and value in the format k1=v1&k2=v2&.... Append &key=merchantSecretKey (the merchant secret key) to form the string to be signed. The merchant signs the string to be signed with its RSA private key using the SHA256WithRSA algorithm.
11. Key Format Requirements
When uploading a public key to the HaiPay platform, note the following format requirements:12. FAQ
Q: Where is the private key stored after choosing HaiPay one-click generation?
Q: Where is the private key stored after choosing HaiPay one-click generation?
The private key is not stored on the HaiPay platform. After generation, it is automatically copied to your clipboard, and you need to save it to a secure location immediately. The platform stores only the public key for signature verification.
The private key cannot be retrieved again after the dialog is closed. Make sure to save it immediately during the operation.
Q: Can the old key still be used after replacement?
Q: Can the old key still be used after replacement?
No. After a key replacement, the original key becomes invalid immediately. Requests signed with the old private key will fail HaiPay’s signature verification. Perform the operation during off-peak business hours, and make sure the new private key has been configured in your system before replacing.
Q: What does it mean when a business ID shows 'All'?
Q: What does it mean when a business ID shows 'All'?
When the appId column displays “All”, it means the key applies to all business IDs under the merchant. Businesses added later are automatically configured with this public key as well. If you need different keys for different business IDs, use the “Specific Business IDs” mapping feature.
Q: Why are there multiple pop-up confirmations when replacing a key?
Q: Why are there multiple pop-up confirmations when replacing a key?
Key replacement is a high-risk operation, so the system is designed with multiple layers of confirmation to prevent accidental operations:
- First layer: key overwrite reminder — informs which business IDs will be affected
- Second layer: secondary confirmation dialog — final confirmation of the replacement
Q: How do I configure different public keys for different business IDs?
Q: How do I configure different public keys for different business IDs?
In the “Add/Replace Key” dialog, select “Specific Business IDs” for the mapped business IDs to open the transfer box. Move the business IDs to be mapped from the left side to the right side. After confirmation, the public key applies only to the business IDs selected on the right.You can also click “Change Business ID Mapping” in the Actions column of the data table to adjust the mapping scope of an existing public key.
Q: What should I do if signature verification fails?
Q: What should I do if signature verification fails?
Please check the following:
- Confirm that the private key you use and the public key uploaded to the platform belong to the same key pair
- Confirm that the signature string is sorted and concatenated in ASCII ascending order
- Confirm that the
signandsign_typefields are excluded - Confirm that parameters with a value of
nullor""are excluded from signing - Confirm that the string to be signed is UTF-8 encoded
- Confirm that loose empty checks (such as PHP
empty()or JS!value) are not used - When verifying response messages, confirm that all new valid fields are included in the verification
Related Topics
Integration Steps Guide
The complete integration flow from account creation to your first API call.
Integration Environment and Request URLs
API integration environment descriptions and request URL reference.
API Description and Common Rules
HaiPay API description and common request/response rules.
RSA Online Key Generation Tool
An online RSA key pair generation tool implemented purely in JavaScript, with no server interaction.